CamLAN Manual
Part 3: Program Settings
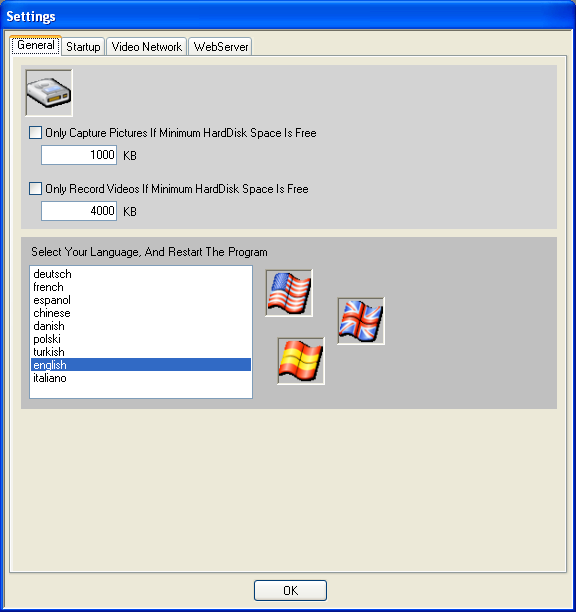
Only Capture Pictures ... -
if this option is selected, pictures are only captured to
harddisk if a minimum of x KB free harddisk space is available
( x = the amount of free space in KB, input 1024 for 1 MB
)
Only Record Videos ... -
if this option is selected, videos are only recorded to harddisk
if a minimum of x KB free harddisk space is available ( x
= the amount of free space in KB )
Select Your Language, And Restart
The Program - select the
program language. This selection becomes active after
a restart.
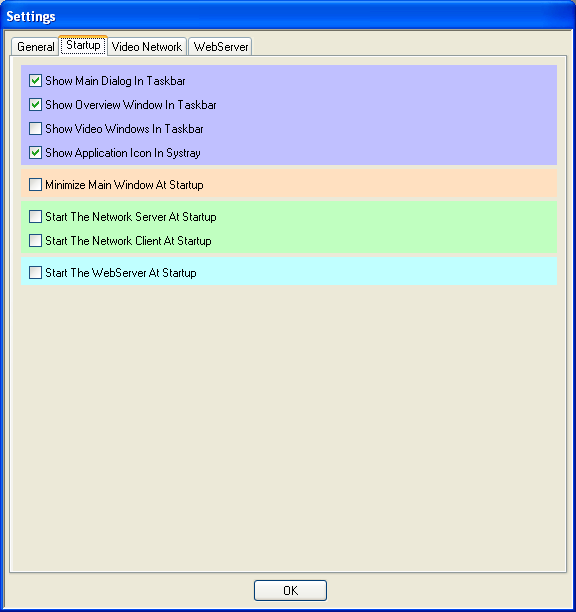
Show Main Dialog In Taskbar -
if selected, a button for the application main window is shown
in the taskbar
Show Overview Window In Taskbar - if selected, a button
for the overview window is shown in the taskbar (the overview
or collection window shows all video windows from all cameras
collected within one window)
Show Video Windows In Taskbar - if selected, for each
video window a button is shown in the taskbar
Show Application Icon In
Systray - if selected, an
icon for the application is shown in the systray. From the
context menu of this icon the application could be closed.
A double click on this icon shows the application main dialog!
Minimize Main Window At Startup - if selected, the main application window is minimized at
startup
Start
The Network Server At Startup - if selected, the internal network server is started
at startup. Adjust all needed network-server/-client settings
before here !
Start The Network Client At Startup - if selected, the internal network client is started
at startup. Adjust all needed network-server/-client settings
before here !
Start The
WebServer At Startup - if
selected, the internal webserver is started at startup.
 If you have not selected to show the main dialog window in
the taskbar and you have not selected to show the application
icon in the systray, then you have no possibility to handle
the application window after you have minimized it. If you have not selected to show the main dialog window in
the taskbar and you have not selected to show the application
icon in the systray, then you have no possibility to handle
the application window after you have minimized it.
 If
you ever want to reset all program settings, then delete the
file SETTINGS.DAT! If
you ever want to reset all program settings, then delete the
file SETTINGS.DAT!
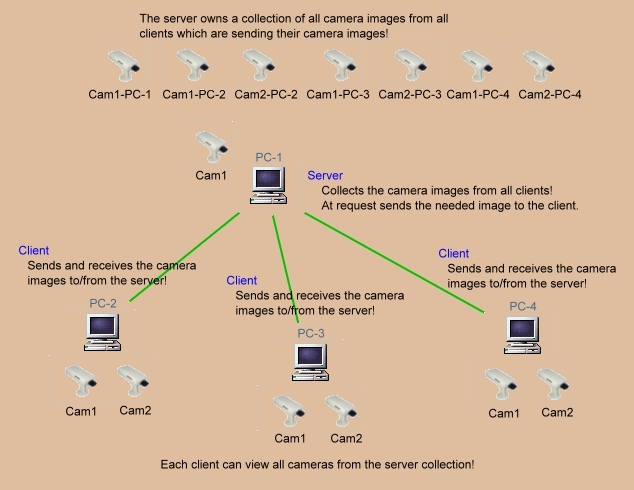
 The integrated video network is used to transfer the
camera picture from all video client PCs
to the video server PC. You have to run at
least two instances of CamLAN (CamUniversal or Campermanent)
on two PCs to use the video network. One PC works as a video
server and collects the video picture from all connected clients.
All cameras running at the client PCs could send their video
picture to the server PC. All instances of CamLAN (CamUniversal
or CamPermanent) are able to connect to the server instance
and receive the video picture from all cameras which have
send their video picture to the server. These cameras are
called RemoteCams. All running cameras, no
matter if they are WebCams, NetCams or RemoteCams can send
their picture to the server PC and become through this way
a RemoteCam! The integrated video network is used to transfer the
camera picture from all video client PCs
to the video server PC. You have to run at
least two instances of CamLAN (CamUniversal or Campermanent)
on two PCs to use the video network. One PC works as a video
server and collects the video picture from all connected clients.
All cameras running at the client PCs could send their video
picture to the server PC. All instances of CamLAN (CamUniversal
or CamPermanent) are able to connect to the server instance
and receive the video picture from all cameras which have
send their video picture to the server. These cameras are
called RemoteCams. All running cameras, no
matter if they are WebCams, NetCams or RemoteCams can send
their picture to the server PC and become through this way
a RemoteCam!
CamLAN
(CamPermanent and CamUniversal) could run the network server
part and the network client part together in one instance.
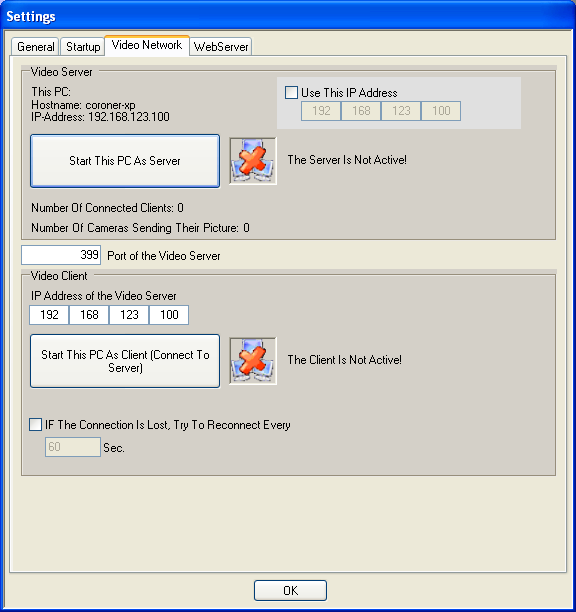
This PC:
Hostname: - the hostname
of the PC where CamLAN is running
IP-Address -
the IP-Address of the PC where CamLAN is running
Use This
IP-Address - CamLAN
determines the IP address of your PC and uses this IP address.
In case of using several network cards in your PC you want
to use a different one. Insert the IP address of your desired
card.
Start This
PC As Server- press
this button to start the integrated video sever
Number Of Connect Clients -
the number of PCs which are connected to this PC and
running the integrated video client
Number Of Cameras Sending Their
Picture - the number
of running cameras which are sending their picture to a connected
client PC. To enable or disable the sending of the camera
picture, goto the camera settings.
Port of the Video Server -
the port of the video server. This must be the same
port on the network server and the network client.
IP Address of the Video Server-
input the IP address of the video server. The IP address
is shown above.
Start This PC As Client -
press this button to start the client functionality.
The client tries to connect to the video server from which
you have instered the IP address. It's important, that the
video server is already running.
Use This
IP-Address - CamLAN
determines the IP address of your PC and uses this IP address.
In case of using several network cards in your PC you want
to use a different one. Insert the IP address of your desired
card.
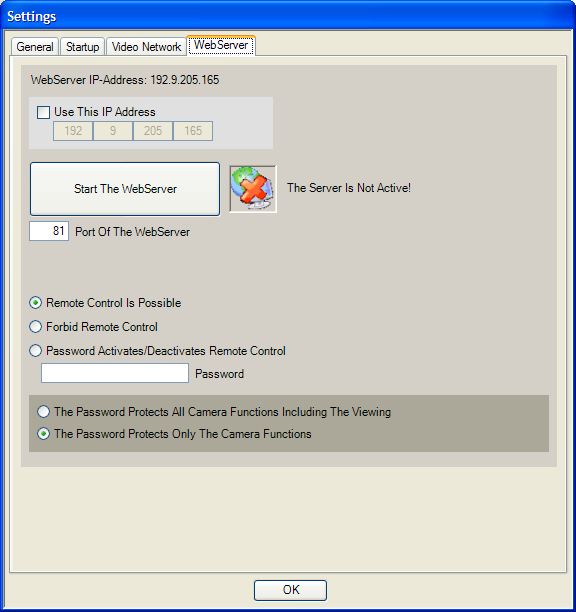
Start
The WebServer- press
this button to start the integrated websever.
Port of the WebServer- the port of the webserver. The
IP address and the port of the webserver must be inserted into
the HTTP request to get the camera video.
It is always possible to demand a video picture from each
camera. Additional to the support of sending video pictures,
the webser supports commands, which controls each camera (possible
commands).
To enable or disable these commands, the following setting
is used.
Remote
Control Is Possible - if selected, the webserver
accepts commands
Forbid
Remote Control - if selected, the webserver
don't accepts commands
Password
Activates/Deactivates Remote Control - if
selected, a password is used to enable or disable the
commands
The Password Protects All Camera Functions
Including The Viewing - if selected, the camera
picture viewing and the camera functions are protected by
password
The Password Protects Only The Camera
Functions - if selected, the camera picture viewing
is always possible, the password protects only the camera functions
Part
4 >> |