CamPermanent Manual
Scheduler Settings

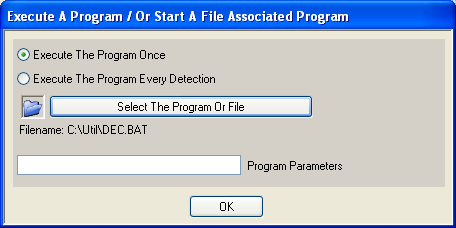
Select The Program Or File - select the program which should be executed.
You could also select a file from which the file type has linked to a default
pogram under Windows. By example select a .TXT file and the notepad is started.
Program Parameters - insert the parameters for the program
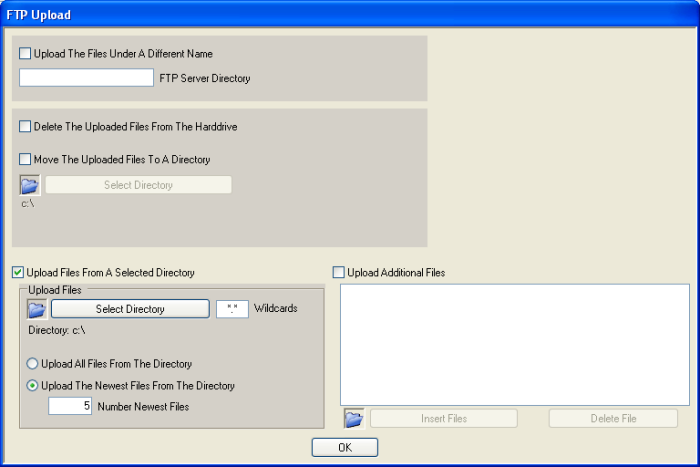
Upload The Files Under A Different Name - if selected, the program gives
all files while they are uploading a different name and following renames
them on the FTP server. This is important if you show a picture on your website
in this moment when the program uploads this picture. If only a part of the
picture is already uploaded and the website is refreshed, an uncomplete picture
is displayed. To prevent this the picture gets his original name only if
it is complete uploaded.
FTP Server Directory - insert the remote FTP server directory
to which the files should be uploaded. "/motion" by example
!
Delete The Uploaded Files From The Harddrive - if selected,
all uploaded files will be deleted after the upload. Be careful
with this option, because all uploaded files from all selections
(current motion picture, files from a selected dir, additional
files) are deleted.
Move The Uploaded Files To A Directory - if selected,
all uploaded files are moved into a selected directory. By example
you could collect all of your uploaded pictures in this directory.
Select Directory - select the target directory
Upload Files From A Selected Directory - if selected,
files from a selectable directory are uploaded
Select Directory - select the files directory
Wildcards - select the used wildcards (*.* for all files,
*.jpg for all JPG pictures etc.)
Upload All Files From The Directory - if selected, all
files from the directory which fits the wildcards are uploaded
Upload The Newest Files From The Directory - if selected,
only the newest files from the directory which fits the wildcards
are uploaded
Number Newest Files - insert the number of newest files
Upload Additional Files - if selected, additional selectable
files are uploaded
Insert Files - select the files. The files are inserted
into the listview.
Delete File - the selected file is deleted from the listview
and not uploaded

Email Subject Text - insert the subject text of the email
Email Body Text - insert the body text of the email
Delete The Sended Files From The Harddrive - if selected,
all sended files will be deleted after the eamil is sended. Be
careful with this option, because all sended files from all selections
(current motion picture, files from a selected dir, additional
files) are deleted.
Move The Sended Files To A Directory - if selected,
all sended files are moved into a selected directory.
By example you could collect all of your sended pictures
in this directory.
Select Directory - select the target directory
Attach Files From A Selected Directory - if
selected, files from a selectable directory are attached
to the email
Select Directory - select the files directory
Wildcards - select the used wildcards (*.* for
all files, *.jpg for all JPG pictures etc.)
Attach All Files From The Directory - if selected,
all files from the directory which fits the wildcards
are attached to the email
Attach The Newest Files From The Directory -
if selected, only the newest files from the directory
which fits the wildcards are attached
Number Newest Files - insert the number of newest
files
Attach Additional Files - if selected, additional
selectable files are attached to the email
Insert Files - select the files. The files are
inserted into the listview and attached to the email.
Delete File - the selected file is deleted from
the listview and not attached to the
email

Delete The Selected Files - select if the files should be
deleted instead of moved
Only Delete The Files If The HardDisk Free Space Is Lower-
if selected, the files are only deleted if the harddisk free space
is lower as the specified amount of KB. If more space is available,
nothing happens!
Move The Selected Files - select if the files should be
moved instead of deleted
Move From-To, Or Delete
Select Source Directory - select the source directory
for the deleting and moving
Select Destination Directory - select the destination
directory for the moving
Select All Files From The Source Directory - if selected,
all files which fits the wildcard are moved or deleted
Select The Oldest Files From The Source Directory - if
selected, only the oldest files which fits the wildcard are moved
or deleted
Number Oldest Files - insert the number of oldest files
Create A Directory - if selected, a directory is created
each time the scheduler function is executed. If the directory
already exists, no problem, nothin is done. So you could select
to create each day a new directory also if the scheduler function
is executed more than one time a day!
Use The Created Directory As Destination For Moving -
if selected, the new created directory is used as the destination
for the moving of files. In this case the above selected directory "button
- Select Destination Directory"
is not used!
Directory Name Settings - opens a dialog for adjusting
the directory name. Like the filename adjusting for picture files,
you can used the time, date and a number to build this directory
name!
|