WebCam-Control-Center Manual
Part 2: Dialogs
Main
Dialog
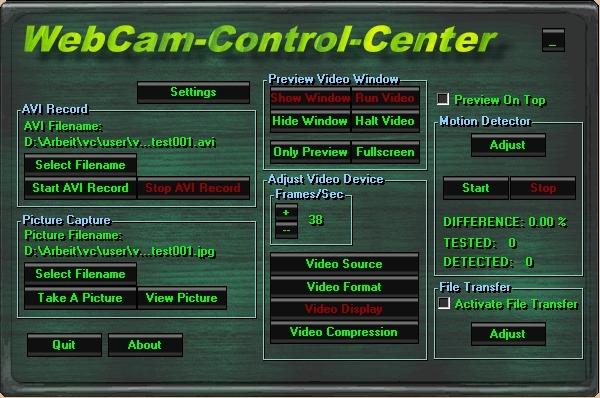
GROUPS
settings - opens the settings
dialog
AVI record
AVI filename - shows the filename of the AVI file which
will be generated at recording
select filename - opens a file dialog to choose
the filename for the AVI file
start AVI record - starts the recording
stop AVI record - stops the recording
picture capture
picture filename - shows the filename of the BMP picture
file
select filename - opens a file dialog to choose
the filename for the BMP picture
take a picture - takes a picture from the current
preview window using the Picture Settings
view picture - opens a dialog which shows the last
taken picture - Picture Viewer
preview video device
video run - shows the running video in the video window
video halt - stops the video at the current picture
show window - shows the video preview window - Preview Window
hide window - hides the video preview window - Preview Window
only preview - shows only the preview window in the middle
of the screen with a black background
full screen - stretches the current preview window
to full screen
adjust video device
frames/sec - selects the amount of frames per second which
the video device should show in the preview window
video source - this dialog is supported from the
device driver of the video device ( enabled if available
) - Device Driver Dialogs
video format - this dialog is supported from the
device driver of the video device ( enabled if available
) - Device Driver Dialogs
video display - this dialog is supported from the
device driver of the video device ( enabled if available
) - Device Driver Dialogs
video compression - this dialog is supported from
the device driver of the video device ( enabled if available
) - Device Driver Dialogs
motion detector
adjust - opens a dialog to adjust all motion detector settings
- Adjust Motion Detector
stop - stops the motion detector
start - starts the motion detector ( disables the
activate file transfer option )
DIFFERENCE - shows the difference between the two
tested pictures in %
TESTED - shows how often the motion detection tested
for difference since start
DETECTED - shows how often motion has been detected
file transfer
activate file transfer - check this if you want to activate
the selected modes from File Transfer FTP/EMAIL/PPM . If
you want to use the 'file transfer' and the 'motion detector' both.
Then start first the 'file transfer' and then the 'motion detector'.
adjust - opens a dialog to adjust all settings for
file transfer File Transfer FTP/EMAIL/PPM
preview on top - select if
the preview window should be topmost above all other windows
about - opens an info window
quit - quits the program
Settings
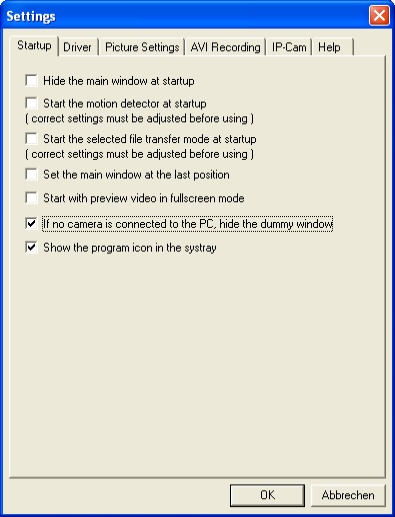
Startup
hide the mainwindow - select if the mainwindow should be hide
at startup, you see only the icon in the taskbar
start the motion detectior - select if the motion
detection should start at startup, the settings like action
at detection and area selection must be done before.
start the selected file transfer mode - select if
the previous selected file transfer mode ( FTP/Email/Perm.Pic.Mode)
should start at startup, all needed settings must be done
before
set the mainwindow at the last position - select
if the mainwindow should appear at startup at the last
position it had in the last session
start with preview video in fullscreen mode - select
if the preview window should be fullscreen at startup
if no camera is connected to the PC, hide the dummy
window - select if the dummy window should be hide.
The dummy window appears if no real camera is connected
to the PC.
show the program icon in the systray - select if
the program icon  should
be showed in the Windows systray or not. You need to restart
the program to activate this option. should
be showed in the Windows systray or not. You need to restart
the program to activate this option.
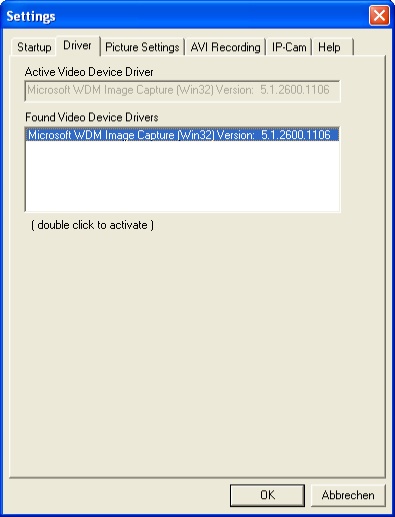
Driver
active video device driver - displays the name of the current
selected video device driver
found video device drivers - displays the names
of all found video device drivers, LEFT CLICK on the driver
name to activate the driver
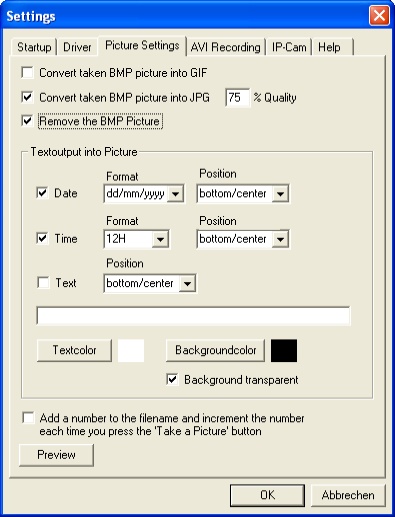
Picture
Settings
The program takes always BMP pictures
as a default. This is because some webcams have not the possibility
to use a RGB picture mode, so that the BMP picture is the basis for
further operations and conversions.
convert taken BMP picture into GIF - select if the BMP picture
should be converted into GIF
convert taken BMP picture into JPG - select if the
BMP picture should be converted into JPG
% quality - determines the picture quality and file
size of the JPG picture
The convert to GIF and convert
to JPG options are useful if you would show your video picture
as a GIF and/or JPG on your webpage! A GIF picture has max. 256
colors, so it's smaller than the BMP. If the BMP has more than
256 colors, the amount of colors will be decreased to 256. The
JPG format supports a high compression factor, so you can greatly
reduce the picture file size, while preserving nearly the same
quality. If you reduce the quality factor you get smaller file
sizes. All browsers supports GIF and JPG pictures.
remove the BMP picture -
select if the BMP picture should be removed after conversion (saves
disk space)
textoutput into picture
date - select if the date should appear in the picture at
the selected position
time - select if the time should appear in the picture
at the selected position in 12 or 24 h format
text - select if your user defined text should appear
in the picture at the selected position
textcolor - select the text color
backgroundcolor - select the background color
background transparent - select if the background
should be transparent
add a number to the filename ... -
select this option to add a number to the generated picturefilename.
The number is resetted to 1 at each program start. Every time you
capture a picture from the main window by button press, the number
is incremented. You get the pictures test001.jpg, test002.jpg....
preview - takes a picture and
shows the picture using the settings you've selected
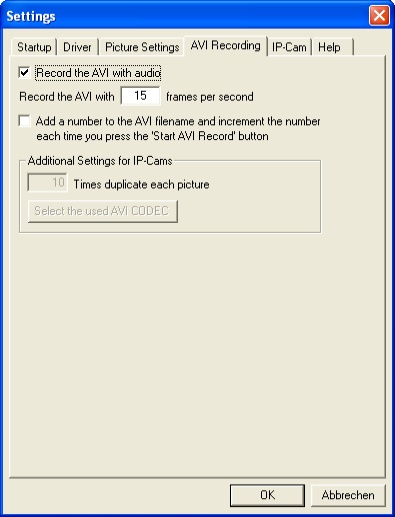
AVI Recording
record the AVI with audio - select
if the AVI should be recorded with audio, if possible
record the AVI with x frames per sec - input the number of
frames which should be generated within AVI recording. The real
reached number of frames depends on the CPU power and video device.
add a number to the AVI filename
... - select this option to add a number to the generated AVI-filename.
The number is resetted to 1 at each program start. Every time you
record an AVI from the main window by button press, the number
is incremented. You get the videos test001.avi, test002.avi....
additional settings for IP-Cams
x times duplicate each picture - select how often a recorded
picture should be shown while watching the video
select the used AVI CODEC - select the used codec
for generating the AVI for IP-Cams. The codec is saved
in the WCCC.DAT file.
Remarks: ( only for IP-Cams
)
In general you can't receive 15 or more picture per second from your
netcam. Let us assume you could receive 15 pictures per second, you
could select 15 for the fps setting and 1 for the duplicated setting.
Then you have an AVI with 15 frames per second where each frame is
a different picture. The AVI runs as fast as it was recorded. It
runs in realtime. But if you can't receive so many pictures you have
to select a duplicated value, that the AVI is not running very very
fast. Let's assume that you receive every second a picture. 1 picture
per second and you select 15 for the fps setting and 1 for the duplicated
setting.Then you have an AVI with 15 frames per second where every
picture is different. The AVI plays with 15 frames per second, so
it shows in 1 second, what you have received within 15 seconds.!
It's runs 15 times faster as realtime. So you have to select a duplicated
value of 15 to show every frame for a longer time ( or you can say,
every picture is shown several times). Play a bit around with these
two values to find the best for your netcam and AVI.
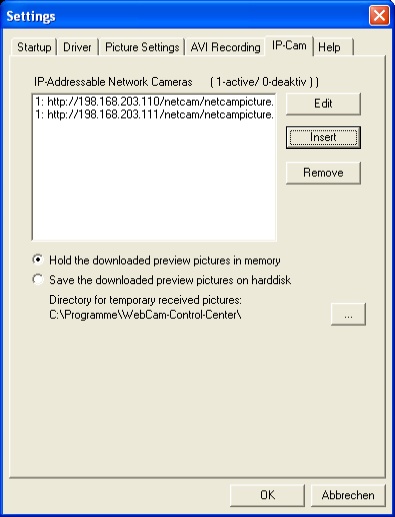 
IP-Cam
IP-Adressable Network Cameras -
this listbox displays all IP-Cameras. "0:" left of the
IP address means, that the IP-Cam is not active, the address is only
saved to activate at a later moment. "1:" left of the IP
address means the IP-Cam is active.
edit - press this button to edit the selected IP-Cam,
or double click on the listbox entry to edit it ( the IP-Cam
settings dialog opens )
insert - opens a dialog to edit the new IP-Cam (
the IP-Cam settings dialog opens )
remove - removes the selected IP-Cam
hold downloaded preview pictures
in memory - downloads the preview pictures into the RAM. Use
this selection if you have enough RAM available. This selection
only works for JPG pictures.
save downloaded preview pictures on harddisk - downloads
the preview pictures direct to the harddisk.
The advantage of loading into RAM
is, that the harddisk could do other things or could be suspended.
The disadvantage is, that some memory leaks could appear by the time.
If you have not enough RAM or your download ( preview ) intervall
is long, then you can select the download to the harddisk.
A changing of this selection becomes true after a new start of the
program.!
"..." - opens a dialog to select the folder
in which the pictures are saved, which are downloaded and
showed within preview mode.
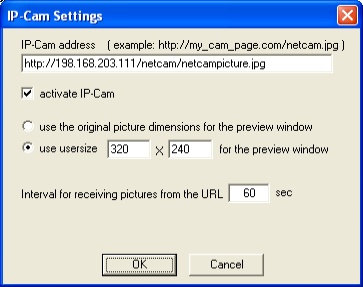
IP-Cam settings
IP-Cam address - the address of the IP-Cam with
picturename added.! ( The picture could only be in BMP
or JPG format. )
activate IP-Cam - check to activate the IP-Cam.
If activated a preview window is shown and you can select
run preview to receive picture from this IP-address.
use picture dimensions - the preview window has
the size of the received picture
use usersize - the preview window has the size of
the user input
interval for receiving ...- this is the intervall
in sec in which pictures are received from the IP-address.
This intervall determines the preview rate.
Remarks
No matter if the IP-Cam picture has the BMP- or JPG-format, the
program works intern with BMP. So if you want to take a JPG picture,
by button press, in motion detection mode etc., then you have to
select the conversion to JPG.
If you have several preview windows hide and changed the focus to
a different preview window, you can press CTRL+SHIFT to unhide all
preview windows to give a former hide window the focus again.
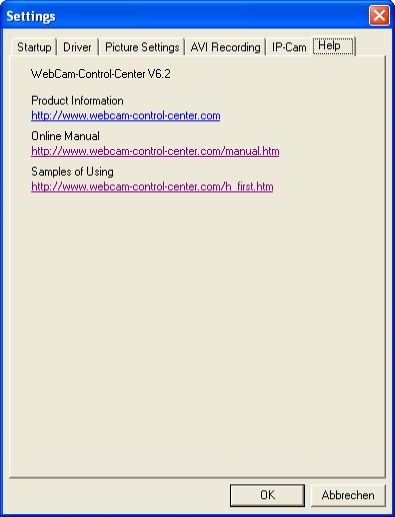
Help
Direct links to the WebCam-Control-Center
webpages, where you can find informations and the manual.
Picture Viewer
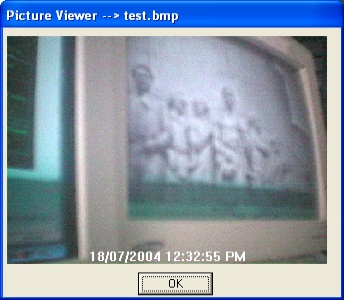
Shows the last taken picture. If
you have selected the conversion into JPG, the JPG picture is shown.
Preview Window
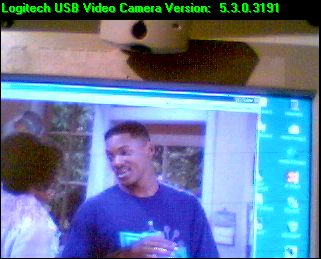
Shows the current video in a preview
window.
In the caption is the driver name and version shown.
Double click with the left mousebutton to hide or unhide the caption.
Double click with the right mousebutton to hide or unhide the Main Dialog.
Adjust
Motion Detector

General Settings
select the relevant picture areas -
opens the dialog for the selection of the picture areas which are
tested for motion detection. - Select Relevant Areas
how to test the current picture
test against start picture - select if the current picture
should always be compared against the picture made at the start
of motion detection
test against previous picture - select if the current
picture should be compared against the previous picture,
so permanent changes are only reported once
test against last no detection picture - select
if the current picture should be compared against the last
picture which had no detection. This is important after
a detection so that you don't immediately get a second
detection reported. If you select previous picture, in
most cases you will get 2 motion detections one after the
other, because after a detection the previous picture includes
the detection movement and the current picture does not.
test for motion
until the first detection - the motion detection only runs
until the first detection is made; it runs using the setting for
'every x sec'
often as possible - the detection runs as often
as your PC it make possible ( be careful with that mode.
)
every x sec - the program tests for motion every
x seconds ( input 3600 if you want one test per hour. )
x detections must occur to be sure
... - select to report a motion only if there are several detections
before, to be sure that there is a real motion and no fluctuation
in the picture quality
x % of the selected area must be ... - to detect a motion,
x% of the selected area must be different
x COLOR-VALUE-DIFF to count ... - If the color value
difference of two compared pixels is greater than x, the
pixel is counted to be different. The amount of as different
counted pixels determines if a motion is detected or not.
Video cameras can determine changes in color that the human
eye cannot detect, causing the program to think that motion
has occured when it has not. Therefore, you should test
with different color-value-diff settings to prevent false
detections.
at start of the motion detector
wait x sec - if you start the motion detection the program
waits the selected seconds before it starts the first test for
motion. In this time you can adjust your video device or leave
the room, etc..
after detection of motion wait x sec - if a motion
was detected the program waits x sec. before the testing
resumes
reset the AVI and picturenumber at start - sets
the AVI and PICnumber which are added to the filename to
1 at start of the motion detection. If you don't check,
the current number is further counted and not set to 1
at start. So you can stop and restart the motion detection
without overwriting the old files. The number is saved
at program end.
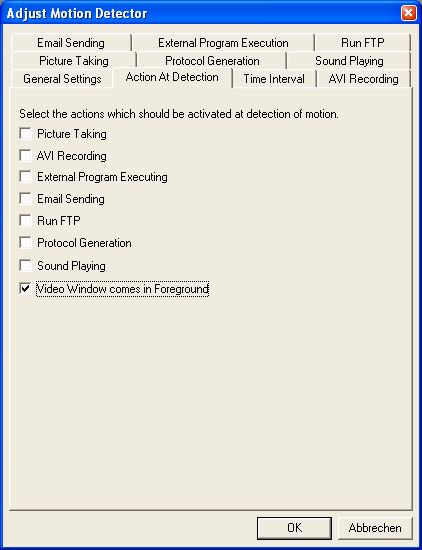
Action at Detection
Select the actions ( functions ) which
should be activated at detection of motion.
Picture Taking, AVI Recording,
External Program Executing, Email Sending, Run FTP, Protocol Generation,
Sound Playing
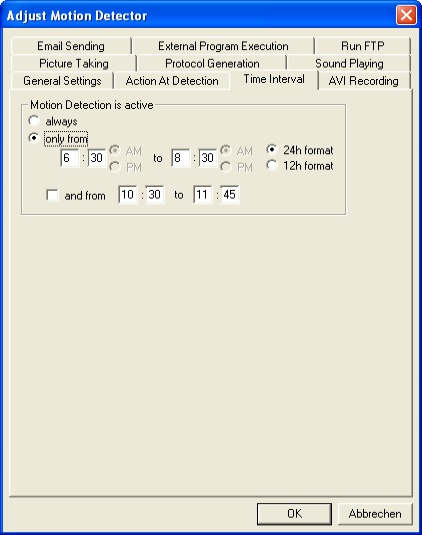
Time Interval
motion detection is active ( only
if started from the main dialog )
always - motion detection is active 24 hours a day
only from - motion detection is only active within the selected time
interval.
and from - a second time period is supported.
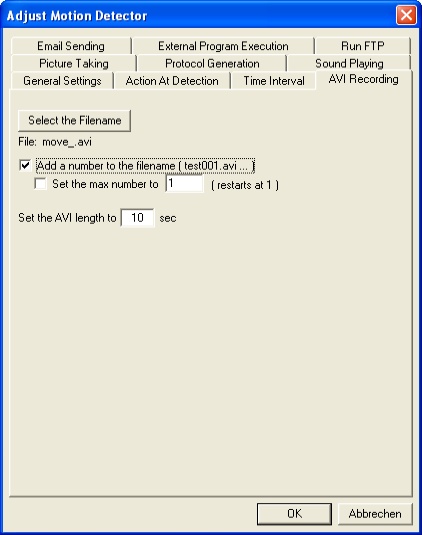
AVI Recording
select the filename - opens
a file dialog to select the filename for the AVI video
add a number to the filename - a new AVI file is
created every time motion is detected. The filenames for
these AVI files are made by using the selected filename
and adding the detection number 001...99999. ( Example:
if the filename is MOVE_.AVI, this results in files named
MOVE_001.AVI, MOVE_002.AVI, ... )
set the max number to - set the maximum file number
to used for naming files. When this max number is reached,
it restarts at 001 ( Example: MOVE_001.AVI to MOVE_020.AVI
). The existing files are overwritten.
AVI length x sec - the length of the AVI video in
seconds
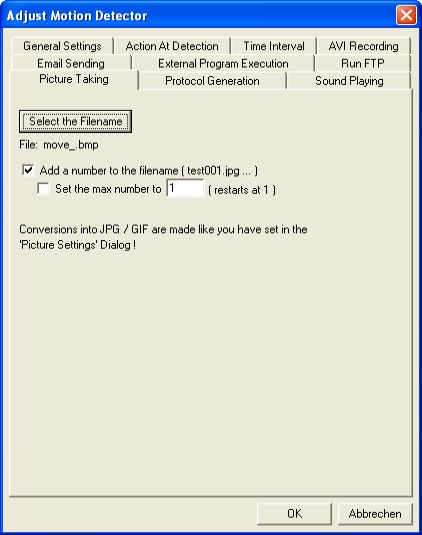
Picture Taking
select the filename - opens
a file dialog to select the filename for the BMP picture
add a number to the filename - a new BMP file is
created every time motion is detected. The filenames for
these BMP files are made by using the selected filename
and adding the detection number 001...99999. ( Example:
if the filename is MOVE_.BMP, this results in files named
MOVE_001.BMP, MOVE_002.BMP, ... )
set the max number to - set the maximum file number
to used for naming files. When this max number is reached,
it restarts at 001 ( Example: MOVE_001.BMP to MOVE_020.BMP
). The existing files are overwritten.
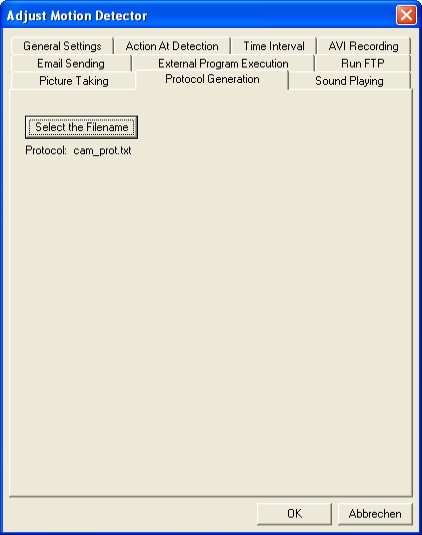
Protocol Generation
Select if a log file should be created at the start
of motion detection. A previous file gets overwritten. It's a TEXT
file which includes the detection number, date and time when the
motion detection occurs:
Nr.:001 DATE: 13-04-1999 TIME: 17:48:47
Nr.:002 DATE: 13-04-1999 TIME: 17:48:53
select the filename - opens a file dialog to select the filename for
the log ( protocol ) file.
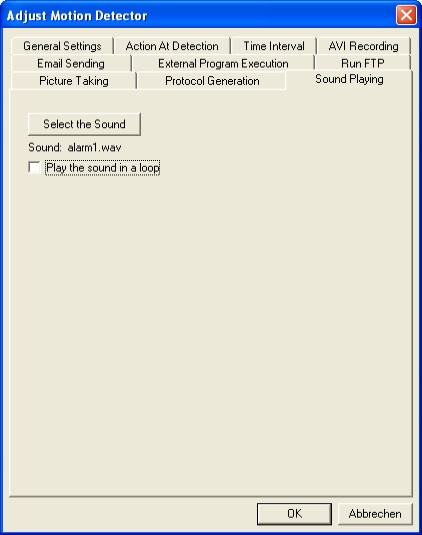
Sound Playing
select the sound - opens a file dialog to
select the filename for the WAV file
play in a loop - plays the sound permanently, if
you don't check it, the sound plays only once until it
ends
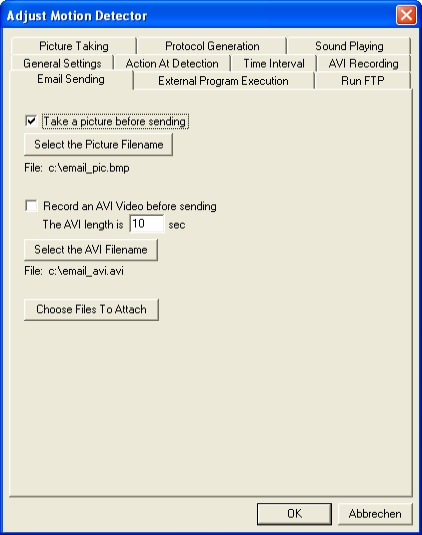
Email Sending
take a picture before sending -
select if the program should take a picture from the current video
source and attach it to your email before sending the email.
select the picture filename -select the filename of the taken
picture. Conversion into JPG / GIF are made like you have selected.
record an AVI Video before sending -
select if the program should record an AVI with the desired length
before sending the email.
select the AVI-filename -select the filename of
the AVI
choose files to attach - opens
the Files To Attach dialog to choose which
files should be attached to the email. You have also to choose the
just taken picture and recorded AVI.
The connection settings are taken
from the email dialog from the 'file transfer' section.
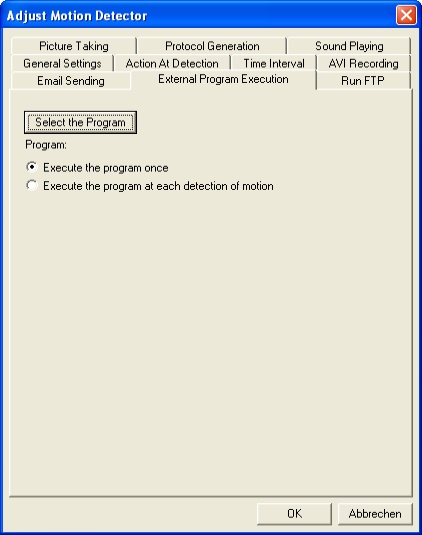
External Program Execution
select the program - opens
a file dialog to select the filename for the program
execute once - the program will be executed only
once
execute at each detection - the program will be
executed each time that motion is detected

Run FTP
take a picture before sending -
select if the program should take a picture from the current video
source before upload.
select the picture filename -select the filename of the taken
picture. Conversion into JPG / GIF are made like you have selected.
choose files to transfer -
opens the Files To Transfer dialog to choose which
files should be uploaded. You have also to choose the just taken
picture.
The connection settings are taken
from the FTP dialog from the 'file transfer' section.
Motion Detector Remarks
The picture START.BMP is generated when motion detection is started.
In addition, the program generates the picture AKT.BMP each time
that motion is tested. Then the two pictures are compared and different
pixels are inspected for differences in color. ONLY the pixels
in the selected areas are compared. If at least x % of the pixels
are different, motion detection is determined to have occurred.
The COLOR-VALUE-DIFF value is important in deciding if two pixels
are different. Video cameras can determine changes in color that
the human eye cannot detect, causing the program to think that
motion has occured when it has not.To prevent false motion detections
you should test using different values. The program calculates
the difference for the red, green and blue values of the same pixels
in both pictures. If the difference is greater than the COLOR-VALUE-DIFF
value, the pixel is counted as different. The difference in color
values can range from 0 to 255. To get the best result you must
select an RGB picture format - Device Driver Dialogs . All RGB formats
are converted into 24 bit.
Sending multiple images of motion
detection is possible in emails, which will each have the latest
version of the same filename attached to it. If you haven't checked take
a picture before sending, the current picture that triggered
the motion detection, AKT.BMP, would be converted into AKT.GIF/.JPG
(if the conversion is selected Picture Settings). If you want to transfer
the current image that triggered the motion detection, this is the
file that you should specify in Files To Transfer, along with any other
images you might want to include. While the file transfer is happening,
the File Transfer Status dialog shows
you the status of the transfer. If you wish you can hide the transfer
status window.
Select Relevant
Areas
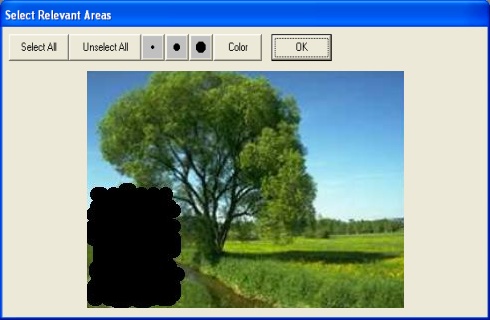
You have to select areas of the
video picture, or the whole picture, before you can start the motion
detection.
The pixels in this selected areas are the only ones which are tested
for differences.
These areas are saved in a mask, which results in the mask file MASK_widthxheight.BIN (
example: MASK_160x120.BIN ).
A mask file is saved for each selected video resolution .
select all - selects the whole
video area
unselect all - unselects all
3 buttons for the brush size - changes the brush
size for drawing the mask
color - changes the brush color to get a better
contrast against the picture
Press the left mouse button down to
draw dots in the picture.
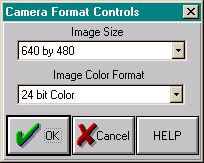
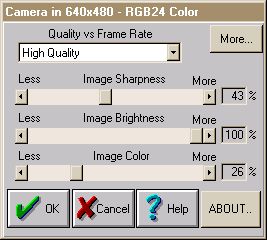
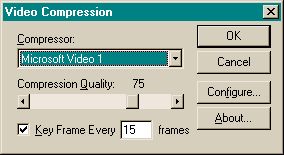
Device Driver
Dialogs
With the device driver dialogs you
can adjust the main settings for your video device.
The device driver dialogs comes with your video device and have a
different look depending on the manufacturer.
The device driver dialogs are ( only examples ):
video format
If you close the video format dialog
the
preview window size dialog appears (no device driver dialog)
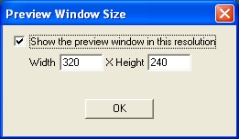
you can adjust your desired preview
window resolution
video source
video compression
Depending on the video camera that
you are using, there is sometimes a video display driver dialog
available.
FTP / EMAIL
/ PPM
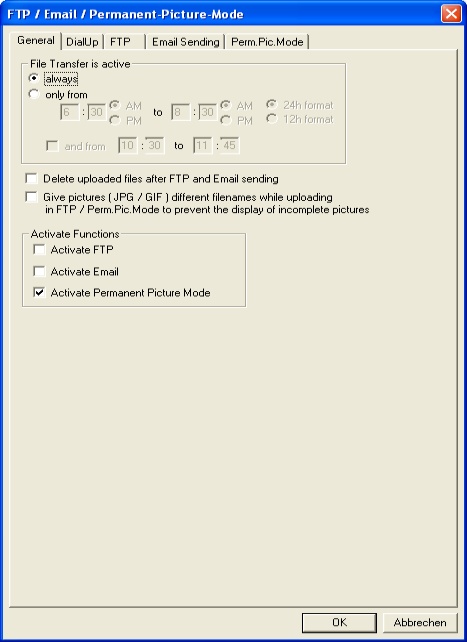
General
file transfer is active
always - all activated modes are active 24 hours a day
only from - the activated modes are only active
within the selected time interval. ( Example: if 'only
from' is set to 8:30 to 14:30 h and you have activated
email every 60 sec, the webcam-control-center sends an
email every 60 seconds, but only from 8:30 to 14:30; Perhaps
your Internet Service Provider has cheaper access within
this period. )
and from - a second time period is supported.
delete uploaded files - select
to delete the files from your harddisk, which are transferred within
FTP mode or attached to an email in email mode after they were sended.
give pictures different filenames - to prevent the
showing of incomplete uploaded files on your webpage, the
picture is uploaded with a dummy filename and after uploading
renamed in the targetfilename.
activate functions
activate FTP - select to activate the FTP transfer ; You must
also select the activate file transfer checkbox in the Main Dialog.
activate Email - select to activate the Email sending
functions ; You must also select the activate file transfer checkbox
in the Main Dialog.
activate Permanent Picture Mode - select to activate
the PPM ; You must also select the activate file transfer checkbox
in the Main Dialog.
Remarks
You can activate both FTP and Email together, but the Permanent
Picture Mode only works alone.
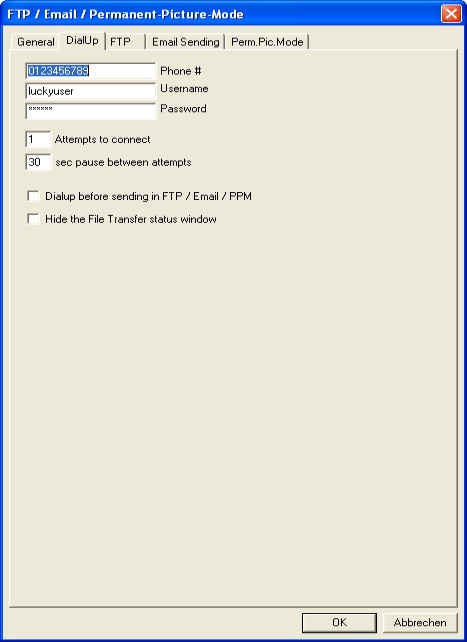
DialUp
phone # - specify the phone
number for your Internet access
username - username for your Internet access
password - password for your Internet access
x attempts to connect - quantity of attempts to
connect
x sec pause between attempts - the number of seconds
to pause between attempts to connect
dialup before FTP/email/ppm - select if you wish
to dial up ( and later hang up ) and connect to the Internet
before the program uploads the files ( don't check this
if you are already or always connected to the Internet
). The dialup is used in FTP, Email and PPM.
hide transfer status window - hide the File Transfer Status window ; If you
run the webcam-control-center in the background, it's better
to hide this window. For testing purposes, show the window
to see what happens.
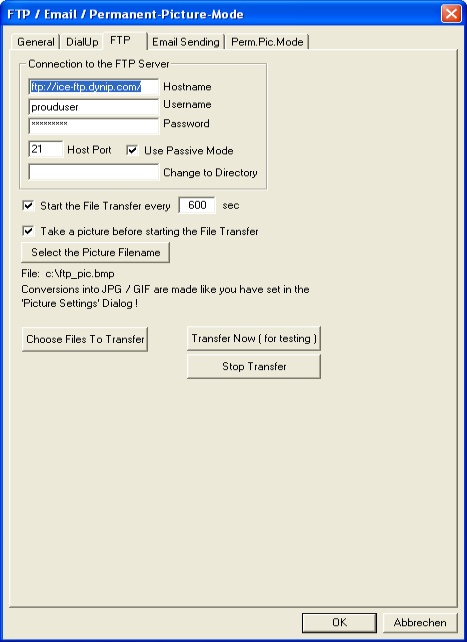
FTP
connection to the FTP server
hostname - the FTP server name (address)
username - username for your FTP server access
password - password for your FTP server access
x hostport - the port of your host ( 21 is the default in
most cases. )
use passiv mode - the passive mode should be activated,
but in some cases the firewall needs to disable the passive
mode
change to directory - if you want to change to a
specific directory on your FTP server before uploading
files, input the directory name (leave it blank to not
change to a different directory. )
start the file transfer every x sec - select
if an FTP transfer should start periodically every x
seconds
take a picture... - select if the program should
take a picture from the current video source before uploading.
select the picturefilename -select the filename
of the taken picture. Conversion into JPG / GIF are made
like you have selected.
transfer now - starts the file
transfer when clicked
stop transfer - stops the file transfer
choose files to transfer - opens the Files To Transfer dialog to choose which
files should be uploaded. You have also to choose the just
taken picture.
Remarks
If you want to use the dialup function, you must have installed
the Dialer Network component of your OS. This includes the
file RASAPI32.DLL. The program tests the existence of RASAPI32.DLL
at startup. The convert to GIF and convert to JPG options
in Picture Settings are useful if you would
prefer to show your video picture as a GIF and/or JPG on your webpage.
All browsers support GIF and JPG pictures. If you have checked take
a picture and would like to upload this file, insert the filename
of the picture (i.e. MyImage.GIF or MyImage.JPG) into the files to
transfer list Files To Transfer. You cannot specify
wildcards in the file names, so you cannot upload multiple images
with numbers appended (i.e. Move_001.JPG, Move_002.JPG...) to your
FTP server. Files you have already uploaded will be overwritten by
files of the same name the next time that you upload those files
to your FTP server. While the file transfer is happening, the File Transfer Status dialog shows
you the status of the transfer. If you wish you can hide the transfer
status window.
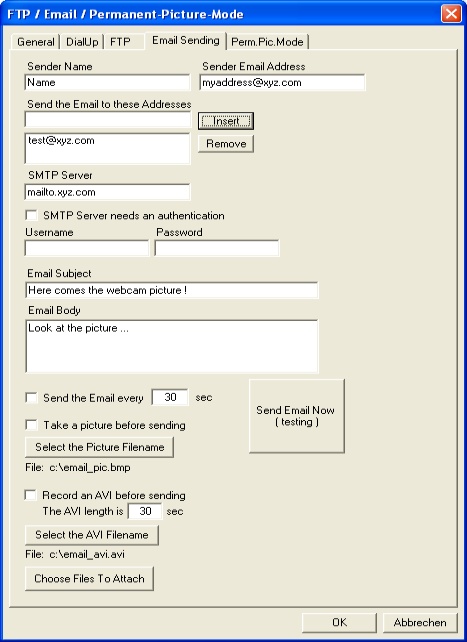
Email Sending
sender name - Insert the name
of the sender
sender email address - Insert your email address
( the address from which the email is being sent ) ; If
you leave this blank, the email's sender will be unknown.
send the email to these addresses - Insert the address
of the receiver and press the 'Insert' button. You can
insert several different receivers. To remove an address,
select the address and press the 'Remove' button. The email
addresses are listed in the file EMAIL_TO.DAT. You
can edit this file manually; in the first line is the number
of addresses, and in the following lines are the addresses.
SMTP server - Insert your SMTP server ; You
can find your SMTP server in your standard email application.
SMTP server needs an authentication - check
if your smtp server needs an authentication to send an
email
Username, Password - authentication datas for the
SMTP server
email subject - the subject of the email ( the headline.
)
email body - a text for the body of the message
send the email every x sec -
select if an email should be sent periodically every x seconds
take a picture before sending - select if the program
should take a picture from the current video source and
attach it to your email before sending. Choose the picture
file for transfer in Files To Attach.
select the picturefilename -select the filename of the taken
picture. Conversion into JPG / GIF are made like you have selected.
record an AVI before sending - select if the program
should record an AVI with the desired length and attach
it to your email before sending. Choose the AVI file for
transfer in Files To Attach.
select the AVI-filename -select the filename of the AVI
send email now - sends the
email when clicked
choose files to attach - opens the Files To Attach dialog to choose which
files should be attached to the email. You have also to
choose the just taken picture and recorded AVI.

Perm.Pic.Mode
select the picturefilename -
opens a file dialog to select the picture file name for the PPM
take a picture every x sec - select if the program
should take a picture and convert it every x seconds
take a picture continuously - select if the program
should takes pictures as often as possible
stop after x sec - select if
the picture taking and sending should stop after x seconds. If you
have selected 'dialup before FTP/email/ppm', the program hangs up
after x seconds.
restart after x sec - select if the picture taking
and sending should be restarted in x seconds after a stop
send JPG picture - select if
the last taken picture ( converted into JPG - Picture Settings ) should immediately
be sent after taking
send GIF picture - select if the last taken picture
( converted into GIF - Picture Settings ) should immediately
be sent after taking
Remarks
In permanent picture mode the program connects once to your
FTP server on the Internet ( if selected ) and then takes and uploads
pictures permanently or in second intervals. If you like, the program
can take a break for a while and then restart from the beginning.
This way you always have the current video picture on your webpage
to always see what is currently happening in front of the camera.
A JAVA applet is
included for showing these pictures "live" on your webpage.
Another possibility is to take permanent pictures (with breaks and/or
intervals) and save them on your hard drive. Then install one of
the several freeware webservers/FTP servers and you will have a constant
surveillance on your LAN or from the Internet.
File Transfer
Status
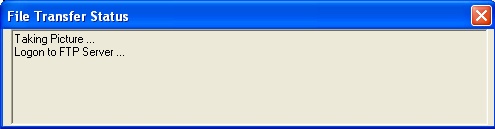
Shows the current action while Dialup,
FTP transfer or Email sending.
Files To Transfer
insert - inserts a file or
several files into the file list
delete - deletes the selected files from the file
list
delete all - erases the file list
add all files from: -
select a directory from which all files or only the files which suits
the wildcard, should be uploaded
these files: - insert the wildcard
The selected files for the FTP upload
are listed in the file FILES_T.DAT (in the file transfer mode)
or in the file FILES_MD.DAT (in motion detection mode) . You
can edit these files manually. In the first line stands the number
of files and in the following lines are the filenames with paths.
Files To Attach
insert - inserts a file or
several files into the file list
delete - deletes the selected files from the file
list
delete all - erases the file list
add all files from: - select a directory
from which all files or only the files which suits the
wildcard, should be attached to the email
these files: - insert the wildcard
The selected files that are attached
to the email are listed in the file ATTACH_T.DAT (in the file
transfer mode) or in the file ATTACH_MD.DAT (in motion detection
mode) . You can edit these files manually. In the first line stands
the number of files, and in the following lines are the filenames
with paths.
Part
3 >> |