CamUniversal Manual
Part 6: Menus / Mouse

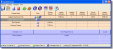
General / Load Cameras ... (CTRL+L) - loads a camera set from a *.cam file. The set contains the cameras with all related settings.
General / Save Cameras (CTRL+C) - saves the existing cameras into the current *.cam file
General / Save Cameras As ... (CTRL+A) - saves the existing cameras into a new *.cam file
General / Delete All Cameras - removes the existing cameras from the program (the *.cam file is not deleted or changed!)
General / Settings ...- opens the program settings dialog
General / Save Settings (CTRL+S)- saves the program settings (SETTINGS.DAT)
General / Exit - closes the application

Camera / Add New Camera - opens the new camera dialog to insert a new camera
Camera / Edit Selected Camera - opens the adjust camera dialog to edit the settings of the
selected camera
Camera / Delete Selected Camera
- deletes the selected camera
Camera / Start Preview For All Cameras
(F2)- starts the preview
for all cameras
Camera
/ Stop Preview For All Cameras (F3)- stops the preview for all cameras
Camera
/ Start The Motion Detection For All Cameras (F4)- starts the motion detector for all cameras. The needed motion
detector settings must be adjusted before.
Camera / Stop The Motion
Detection For All Cameras (F5)- stops the motion detector for all cameras
Camera / Start The Scheduler
For All Cameras (F6)- starts
the scheduler for all cameras.
You have to create at least one job before.
Camera
/ Stop The Scheduler For All Cameras (F7)- stop the scheduler for all cameras

Windows
/ Collect All Video Windows (F8)- combines all camera video windows in the collection window
Windows
/ Separate All Video Windows (F9)- closes
the collection window and separates the video windows
Windows
/ Show All Video Windows (CTRL+V)- shows all camera video windows
Windows
/ Hide All Video Windows (CTRL+H)- hides
all camera video windows. The camera functions remains active.
Windows
/ Show All Video Windows At (0,0) - show all video windows at the upper left corner of the screen.
This could be necessary if the program is started with previous
settings on a different PC with a different resolution or
if the primary monitor is changed on a multi monitor system.
Windows
/ Set All Video Windows At Topmost - set all video windows at a topmost window in front of all
other windows
Windows
/ Open The Media Viewer - opens the media viewer
Windows
/ AVI Creator ... - opens the AVI creator dialog

Info
/ Online Manual ... (F1) - opens
the standard Internet browser with the manual webpage
Info
/ Goto The Webpage ... - opens
the standard Internet browser with the CrazyPixels main webpage
Info
/ Forum ... - opens
the standard Internet browser with the CrazyPixels Forum webpage
Info
/ Register ... - opens
the registration dialog. With this dialog you create your keyinfo file which is needed to get your key.
Info / System
Infos ...- opens
a dialog which displays informations about the program and
your system
Info
/ About ...- opens the about
dialog
A
right mousebutton click into a camera row opens the camera
context menu.
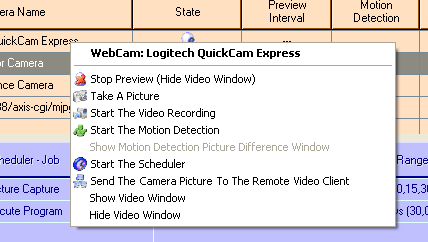
Start/Stop
Preview - starts/stops the
preview of the camera (only if there is no motion detector
or scheduler running). The video window of the camera gets
hidden at stopping and is shown at starting. You could also
stop the preview by closing the video window with the close
button.
Take A
Picture -
takes a picture
Start/Stop The Video Recording
- starts/stops the video recording
Start/Stop The Motion Detection - starts/stops the motion detector of the camera
Show Motion Detection Picture Difference
Window - shows the Difference
Window. In this window you see the current camera picture
with all pixels coloured which are different between the current
picture and the comparing picture. To reduce or increase the
amount of different pixels (% area difference) the values
for the pixel difference (red,green,blue) must be adjusted.
The pixel difference values and the area which is tested for
motion are adjustable under the motion detector settings
dialog.
Start/Stop
The Scheduler -
starts/stops the scheduler of the camera
Send (Send Not)
The Camera Picture To The Remote Video Client - enables/disables the camera picture sending to a connected
video client
Show Video Window - shows
the video window.
Hide Video
Window - hides
the video window. With this function you hide the video window,
all running functions are still working. It is not the same,
as if you close the video window from the close button!
A
right mousebutton click into the video window opens the video
window context menu.
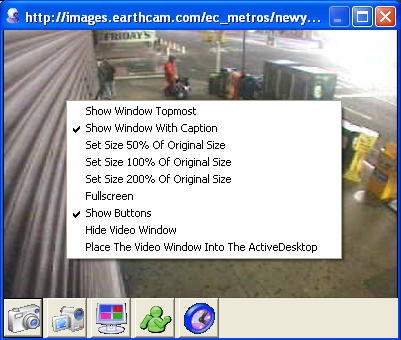
Show
Window Topmost - shows this
window as a topmost window in front of all other windows or
not
Show Window With Caption - shows or hides the window caption
Set Size 50% Of Original Size - the window size is changed so that the video size is
50% of the original video size
Set Size 100% Of Original Size - the window size is changed so that the video size has
the original video size
Set Size 200% Of Original Size - the window size is changed so that the video size is
200% of the original video size
Fullscreen - stretches the window to fullscreen
Show Buttons - shows or hides the buttons below the video
Hide Video
Window - hides
the video window. With this function you hide the video window,
all running functions are still working. It is not the same,
as if you close the video window from the close button!
Place The Video Window Into The
ActiveDesktop - if the ActiveDesktop is enabled, the preview window is placed
into the ActiveDesktop. The window lays behind all program
windows and behind the desktop icons.
A
right mousebutton click into the overview window opens the
context menu.

Show Window Topmost
- shows this window as a
topmost window in front of all other windows or not
Show Window With Caption - shows or hides the window caption
Fullscreen - stretches the window to fullscreen
Not Fullscreen
- returns
from fullscreen to the former window size
1 Column - arranges
the video windows in 1 column
2 Columns - arranges the video windows in 2 columns
1 Row - arranges the video windows in 1 row
2 Rows - arranges the video windows in 2 rows
Quadratic Order - arranges the video windows in a quadratic order
Place
The Video Window Into The ActiveDesktop - if the ActiveDesktop is enabled, the overview window is placed
into the ActiveDesktop. The window lays behind all program
windows and behind the desktop icons.
Take
A Picture -
takes a picture
Start/Stop The Video Recording
- starts/stops the video recording
Start/Stop The Motion Detection - starts/stops the motion detector of the camera
Start/Stop
The Scheduler -
starts/stops the scheduler of the camera
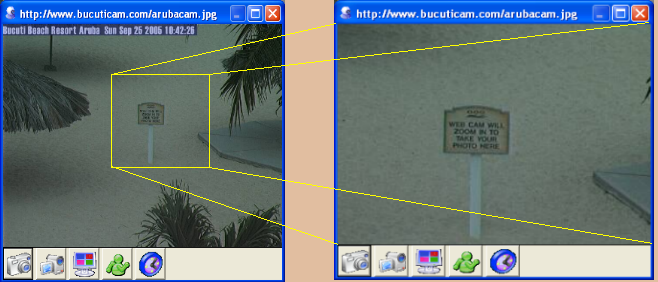
Mouse Buttons
/ Function
Left Button - to move the video window and the overview window, hold the
left mousebutton down, move the mouse and release the mousebutton
at the desired position
Right Button - the right mousebutton opens
the context menus
Middle Button - with the middle mousebutton
you could zoom into the camera video. This function is available
in the video window and the overview window. Hold the middle
mousebutton down (the cursor changes into a cross), move the
mousebutton to create a virtual rectangle and release the
middle mousebutton to zoom into this selected area!
Part
7 >> |