CamUniversal Manual
Part 5: Adjust Camera

Used Camera Name -
you could select to use the default name for the camera, or insert a
user defined camera name. The default name for NetCams is the camera
picture URL and for WebCams the camera name which comes from the device
driver.
Picture Capturing - opens the picture
capture settings dialog
Video Recording - opens the video
recording settings dialog
 CamUniversal
supports 3 different modes in which pictures are captured and videos
are recorded. CamUniversal
supports 3 different modes in which pictures are captured and videos
are recorded.
Mode 1: Normal Mode
This mode is active if you capture a picture or record a video if
you press the appropriate button from the video window. Additional you
could start the action from the context menu of the camera.
Mode 2: Motion Detector Mode
This mode is active if you run the motion detector and have choosen
to capture a picture or record a video at detection of motion.
Mode 3: Scheduler Mode
This mode is active if you have added a scheduler job, which captures
a picture or records a video. Each scheduler job could have his own settings!
All 3 modes could be active parallel and all 3 modes could have total
different settings for the picture capture and video recording. If you
want always the same settings in the 3 modes, you could use the following
setting and you have to insert your settings only once. Picture Capturing
And Video Recording ... - if selected the settings are the same
in all 3 modes (and for all scheduler jobs)
... Are Separate Adjustable For ... -
if selected each mode has his own settings
Video Server Settings
Send The Camera Picture To The Connected Video Client - check if the
camera should work as RemoteCam. If checked the program sends the camera
picture in intervals to the connected video clients.
Sending Interval - interval in which the program
sends the camera picture
JPG Picture Quality - internal the camera picture
is send in JPG picture format. Select the picture quality
to adjust the picture size to find a compromise between
a low bandwidth and a good picture visualizing.
NetCam Settings (the following settings
are only relevant for NetCams)
The NetCam Picture Address (URL) - insert the direct link to the camera
picture. You have to insert the URL which points direct to the camera picture
not only to the camera webserver. Insert http://192.168.1.110/picture.jpg
instead of only http://192.168.1.110 for your netcam.
Picture Receiving Interval From The URL - interval
in which the program tries to receive a picture from the
NetCam. Don't select an interval which is smaller than
the camera is able to generate a new picture, because in
this case you would receive the same picture several times
again and needless reduce the network bandwidth.
Deactivate The Preview If X-Times The Picture
Could Not Received - if selected the preview is stopped
if x-times a picture could not received from the selected
URL. This could happen if the camera is temporary offline.
Camera Needs Authentication - select if the camera
webserver needs an authentication
Username - username for the authentication
Password - password for the authentication

Detector Settings
Compare Current Picture With Start Picture -
the current camera picture is compared to the camera picture at motion
detection start
Compare Current Picture With Previous Picture -
the current camera picture is compared to the previous camera picture
Compare Current Picture With Last Picture With No Detection -
the current camera picture is compared to the last camera
picture where no motion was detected
The first
selection is useful if the viewed area doesn't
change and is always exact the same. This could be a room
which has no windows and daylight. The content of the camera
picture doesn't changes through the motion detection phase.
The second selection is used in the most cases. Little
changes of the camera picture through a longer period doesn't matter. If
the sunlight influence in a room changes through several hours, the program
ignores it, because the difference between the current and the previous
picture is so little, that it doesn't matter. For big changes between daytime
and nighttime, you have to select several different jobs!
The third selection avoids the notification of a motion
at the moment when no more motions are available. If you have selected
the second test case and a person comes into the camera picture you get
a motion detection. If the person leaves the picture and you have the normal
situation again you get a motion detection too, because the picture distinguishes
from the previous picture. 2 detections for one motion!
Testmode - select the motion detector testing mode
Fast Mode - only every second pixel in the video
picture is tested. So the needed CPU capacity is cut in
half. The results are in nearly all cases the same as in
the Normal Mode!
Normal Mode - each pixel in the video picture is
tested
X Times Must A Motion Be Detected To Be Sure...
- select how many
times a motion must be detected from the program to report
a motion. If you are not sure that a motion detection has
really a motion as reason and not a low quality video device,
select a higher value.
These Settings Are Job Special (only
the settings from this group are job special all further motion detector
settings are the same for all jobs)
Test Interval - select the motion detection
test interval
Pixel Difference Value - this value determines how
many pixels of the camera picture are counted to be different.
The current camera picture is compared to the previous
(or first) camera picture. This is done pixelwise. To decide
if two pixels of the two pictures are equal or different
they are compared regarding their color values. The color
values are seperated into a red, green and blue value.
If the red value or the green value or the blue value differs
about 18% (sample above), the pixel is counted as different.
So you can adjust this value regarding the quality of your
video device.
++ - 18% pixel
difference value, the motion detector is not very sensitive
+ - 13% pixel difference
value, the motion detector is more sensitive
- - 9% pixel difference
value, the motion detector is sensitive
-- - 6% pixel difference
value, the motion detector is very sensitive
 The
best way to find a suitable value for the pixel difference
is to start the motion detector for the camera and open the "Picture
Difference Window" from the main dialog context menu.
In this window you see all different pixels colored. So you
can adjust the pixel difference value until you get your desired
result. The
best way to find a suitable value for the pixel difference
is to start the motion detector for the camera and open the "Picture
Difference Window" from the main dialog context menu.
In this window you see all different pixels colored. So you
can adjust the pixel difference value until you get your desired
result.
|
 |
% Of The Selected Area Must Be Different To
Report A Motion - the amount (in %) of the selected area which
must be different to report a motion. The selected area is the area
from the picture which is tested for motion. You have the possibility
not to select the whole picture to test for motion, but only an area
within the picture. Perhaps you would only to test the area from the
picture in which is the door to the room. Adjust this value and the
pixel difference value carefully to get the best result. Test the situation
in case of a motion, perhaps walk into the camera picture to see how
the picture difference changes. So you get a good idea how to adjust
the values.
Select The Active Time Range - opens the
dialog for selecting the active time range
The time range is the range
in which the job is active. You can create several jobs, with
different settings (except the action) and different time ranges.
Run Always - the
job should be always active. This is only useful if you have
only one job, because the first job in the list which time is
active is executed. There is always only one job active!
Run From Start-Time To Stop-Time - select
the start and stoptime. Additional select the active
days!
|
 |
These Settings Are The Same For All Jobs
Picture Area
Selection - opens
the dialog for selecting the relevant picture area
The relevant picture
area is the area of the picture which is tested for motion.
So you can select to test not the whole picture, but only
the area of the entrance door, the window or something else.
Select Paint Color - opens
the dialog to select the color for painting the area. This
color is also used in the "Picture Difference Window"
Paint Color Transparency - transparency
of the paint color
Brush Size - the brush size in
pixel
Select All - select the whole
picture
Clear All - unselect the whole
picture
|
|
Select The Action At Detection - opens
the dialog to
select the action which should be executed at detection of motion!
After Each Motion Detection Wait - if
selected the program waits the amount of seconds after a motion was detected,
before the test for motion continues.
At Motion Detection Start Wait - if selected
the program waits the amount of seconds at start of the
motion detector, before the first test is made. For example
this is useful to leave the room or do something else.
Add New Job - adds a job to
the joblist. The settings of this job are the current settings
you have made and the selected time range.
Remove Selected Job - removes the selected
job from the joblist
Take Current Settings On The Selected Job - takes
the current settings and the current time range settings
on the selected job.
Motion
Detection Jobs
The motion detection job list
shows all created jobs. You have the possibility to create not only
one job, but several jobs. The jobs differs in: - the Test Interval
- the Area Difference - the Pixel Value - the Time Range!
The picture area and the action at detection are the same for all
jobs (but only for the current adjusting camera)!
You could create for each camera their own jobs!
The joblist is executed from the first to the last entry. The first
job, which time range is current valid, is executed. So only one
job is executed (the scheduler differs in this behaviour). Because
all jobs have the same action it makes no sense to execute more
than one.
Why several jobs?
You have the possibility to create several jobs to have for each
time depending situation one. So you could test for motion at the
night time every 5sec., but at the day time every 2sec.. You could
test for motion if the sunlight is available with different settings
for the area difference and with different pixel values as in the
night. You test on the weekend with different settings as on workdays!
There are several cases in which you want different motion detector
settings!

Select Job
Select
the function of a new job through the radiobuttons. By pressing one
of the job function buttons (FTP Settings, Email Settings, etc.)
you open the dialog to adjust the function settings. Then you have
to select the time at which the job should be active. At last, press
the "Add Job" button to add the job to the scheduler job
list. If you want to edit the function of an existing job, please
select the job from the scheduler list and then press the "Edit
Job Settings"
button. The program knows the function of the selected job and
opens the related settings dialog.
DialUp -
select if the job should dialup. The best is to select a point
in time for this job and not an interval. Perhaps "Work Once At Scheduler
Start" or "Work Once Excact At 10:00". So you could dialup
before you send an email or upload to the FTP server.
HangUp - select if the job should hangup and therefore
disconnect the connection.
Disconnect From FTP Server -
select if the job should disconnect from the FTP server (only executed
if there is a connection existing)
Connect If Necessary, FTP upload -
select if the job should connect to the FTP server and do an upload.
The connection is only created if there is no connection already
existing. After this, the FTP upload is done!
Connect, FTP Upload, Disconnect -
select if the job should connect to the FTP server, do
an upload to the FTP server and then disconnect from the
FTP server.
The
difference of the above selections is, that you only want
to have a connection to the FTP server in this moment when
the program uploads the files, or you want to establish
a connection for a longer period. In the Connect If
Necessary, FTP upload case you could faster upload
(in shorter intervals) because the connection already exists
and don't need to be established each time new. The connection
is established at the first upload and then existing until
you execute the Disconnect From FTP Server job.
If you want to upload only now and then you could select Connect,
FTP Upload, Disconnect, but if you want to upload in
short intervals (your camera picture to your homepage)
select Connect If Necessary, FTP upload and disconnect
the connection by selecting Disconnect From FTP Server at
"Work Once At Scheduler End".
FTP Settings -
opens the FTP settings dialog
Send Email - select if the job should send
an email
Email Settings - opens the Email settings dialog
Picture Capture - select if the job should capture
a picture
Picture Settings - opens the picture settings dialog
Video Record - select if the job should record a video
Record Settings - opens the record settings dialog
Lengh (Sec.) - insert the length of the video in
seconds
Execute Program - select if
the job should execute an external program
Execute Settings - opens the settings dialog
Delete/Move Files - select if the job should
move or delete files
Delete/Move Settings - opens the settings dialog
Select Active Job Time
You have to select the time range/time interval, time
point and if the job should be active at scheduler start
or/and scheduler stop. So there are 4 different possible
selections which should be selected as a single one or
as a combination of all.
Work
Within A Time Range In A Selected Interval - the job should be
executed within a time range and in this time range in the selected
interval. You could select to be executed from 8:00 until 10:00 every
10sec, or alway every 3600sec. (each hour), or from 10:00 until 11:00
every 30sec. on Mondays, etc. etc.
Work Interval, Every ... - select the interval in
seconds
Select The Active Time Range - opens the time range
dialog
The time range is the range
in which the job is active. You can create several jobs, with
different settings and different time ranges.
You can also create one job twice and give him different time
ranges and intervals!
Run Always - the
job should be always executed
Run From Start-Time To Stop-Time - select
the start and stoptime. Additional select the active
days!
|
|
Work Once Exact At - the job should be executed
exact at one point in time
Select The Active Time - opens
the time dialog
Choose the
point in time at which the job should be executed. You have
to select a point in time and the associated day or several
days.
|
 |
Work Within A Time Range At Certain Minutes -
the job should be executed at certain minutes within the selected time
range ( by example from 8:00 to 11:00 at minutes 5,10,22. So it runs
at 8:05, 8:10, 8:22, 9:05, 9:10, 9:22, 10:05, 10:10, 10:22 )
Select The Active Minutes -
opens the time dialog
Choose the
the time range ( always or a range ) an the minutes!
|
 |
Work Once At Scheduler Start - the
job should be executed at the start of the scheduler
Work Once At Scheduler End - the
job should be executed at the end of the scheduler
Add New Job - adds the current selected job-function with the current
selected time settings to the joblist as a new job
Remove Selected Job - removes the selected job from
the joblist
Take Current Settings On The Selected Job - takes
the current settings from the job-functions and the current
time settings on the selected job
Job List
The scheduler job list shows all created jobs. The
jobs are shown with their function name and time range/interval.
Left of the job there is a checkbox with which you could
decide if the job should be executed or not. So you could
decide from time to time which jobs should be executed
and which not. In general you have checked all of them!
Scheduler
Jobs
All jobs in the joblist which are checked are executed. The execution
order goes from the first entry to the last. This is important if you want
to have an execution order. This could be the case if you want to capture
a picture and then upload the picture to a FTP server. You could select
for both the same time point or time range/interval and position the capture
job above of the upload job within the joblist. So you get always sure,
that the picture is first captured.
In difference to the motion detector joblist, not only the first
job which time is just active is executed, but all of them. With this you
have the possibility of thousands of job combinations with different settings
and time ranges. You could create several picture capture jobs, which are
all running parallel, where each job captures the pictures with different
settings and in different time ranges. The first could capture in JPG format
at a specific size, the second captures in TIFF format with an overly picture
every hour, the third captures a picture which should later be uploaded
or sended by email and so on.
The time selection of a job is a combination of the 4 selectable
settings. So a job could be active at the start of the scheduler and at
the end, or at the start and from 8:00 until 10:00 every 10sec. plus at
10:30 on Monday, etc. etc.

Start The Motion Detector At Startup -
select if the motion detector should be automatically started at program
startup
Start The Scheduler At Startup - select if the scheduler
should be automatically started at program startup

Video Settings
Video Record Codec - all in the system
available video record codecs are listed. The current used codec is shown.
If you want to have more codecs available, you have to install them into
your Windows OS!
If you change the selection, the program tests, if the codec could
be used for recording. This depends on the video device, audio device
and further codecs. Not all codecs works together which each other!
Video Codec - if the selected codec supports a dialog
for adjusting settings, the button becomes available. There
are some codecs available, which notifys that they support
a dialog, but that is not the case. If this is the case,
nothing happens at button press.
Video Device Settings - opens the appropriate device
driver dialog if available
Video Preview Settings - opens the appropriate device
driver dialog if available
Video Record Settings - opens the appropriate device
driver dialog if available
Video Source (only TV Tuner) - all available
video input sources are listed and selectable. In general these are Tuner,
Composite, S-Video.
Audio Settings
Audio Record Device - all in the system
available audio record devices are listed. The current used device is shown.
In case of receiving a MPEG4 stream, this option is disabled. If
the MPEG4 stream contains audio you get the audio automatically.
Audio Record Codec - all in the system
available audio record codecs are listed. The current used codec is
shown. If you want to have more codecs available, you have to install
them into your Windows OS!
If you change the selection, the program tests, if the codec
could be used for recording. This depends on the video device, audio
device and further codecs. Not all codecs works together which each
other!
Audio Codec - if the selected codec supports a dialog
for adjusting settings, the button becomes available. There
are some codecs available, which notifys that they support
a dialog, but that is not the case. If this is the case,
nothing happens at button press.
Audio Device Settings - opens the appropriate device
driver dialog if available
Audio Preview Settings - opens the appropriate device
driver dialog if available
Audio Record Settings - opens the appropriate device
driver dialog if available
Channels - the audio channels (mono, stereo)
SampleSize - the audio sample sizes (8bit, 16bit)
SampleRate - the audio samplerates (11025Hz, 22050Hz,
44100Hz)
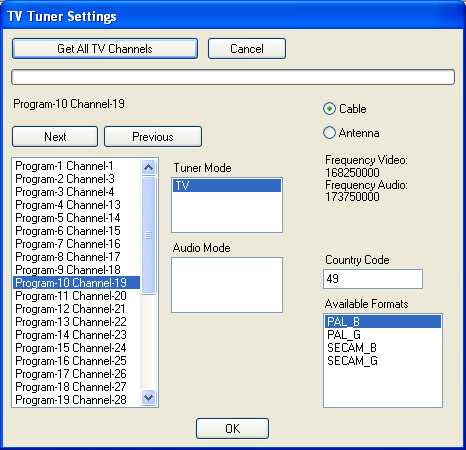
TV Tuner Settings (only TV Tuner)
TV Tuner Settings - opens the TV tuner dialog to
adjust the tuner settings
 It's
important to run this function, otherwise there would be
no programs available which are selectable from the video
window buttons. The found programs are saved in the file
PROGRAMS.DAT! It's
important to run this function, otherwise there would be
no programs available which are selectable from the video
window buttons. The found programs are saved in the file
PROGRAMS.DAT!
Show Device Infos - shows infos about the
selected devices and codecs
Devices
and Codecs
Changes in the property pages of the
devices are often not saved by the video device driver. The exceptions
are the properties of the video and audio record codecs. In most
cases the settings are saved by the driver.
Changes made in the property pages
will be reflected immediately in CamUniversal. But the reverse is
not always true, so internal changes may not be reflected in the
associated property page! After loading of the saved settings the
video framesize is internal set and reflected in the property page,
the frames per second (fps) value is internal set, but not reflected
in the property page, there is a default value of the driver shown
and the compression type (RGB24,RGB32,YVU9,etc.) could not be restored!
Furthermore some combinations of video record codecs and video
compression types are not working together! So, if you select a
video record codec (everything different to "none") then
let the video compression value to be the driver default (in most
cases RGB24)!
Part
6 >> |